Operation Compass: British Breakthrough Attack
The first battle in the campaign sees the British forces launching a breakthrough attack against the Italian positions south of Side Barrani. The British have all their forces available for this battle, but due to the defender only having half the forces available in the scenario, the Italians can only field half their troops. Field defences and artillery assets may be purchased in addition to the forces available, but the points must be deducted from those available for the battle.
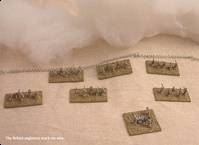
British Battlegroup
The British battlegroup comprises of the complete forces available to the British as detailed on the previous page. In addition to this, after rolling the random points modifier, the British gain 10% of the total, which is an additional 200 points. These are spent on artillery assets - 10 HE and 5 Smoke.
Italian Battlegroup
As the Italians are in defence, they have half the forces available. The Italians deploy the following against the British:
- CO
- Infantry Battalion
- Medium Tank Battalion
- Divisional ATG Company
- FAO
- Light Artillery Battalion
- Medium Artillery Battalion
In addition, they have eight marked minefields measuring a total area of 120cm x 10cm - enough to cover the width of the front they are to defend.
Scheduled Support
Once the table has been set-up, including the field defences, both players determine their scheduled artillery and air strikes. As there is no air support for either side in the game, all players have to do is determine their artillery schedules. The British decide to cover the entire minefield in high explosive (HE) and smoke on the first turn, then continue with HE on the second turn. The Italians schedule a concentrated strike against the gap in the minefield on turn three.
Note that these are classed as registered targets and can be used at other times during the game, subject to successful requests for artillery support. Unlike artillery support requested against predicted targets, you do not have to roll for deviation.
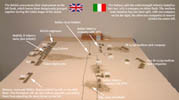
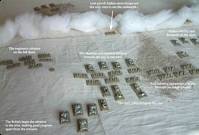
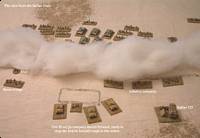
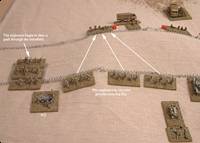
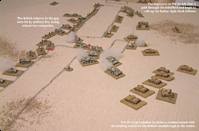
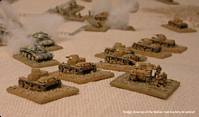
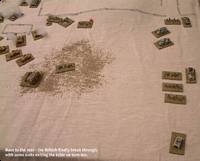
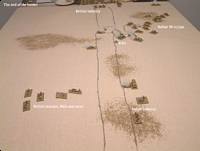
Deployment
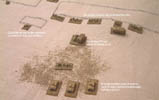
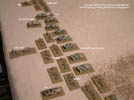
Both sides take it in turns to deploy one command unit at a time. The British must then place the rest of their troops within 20cm of a command unit. The Italians place theirs last, anywhere on their half of the table. The following pictures show the table after both sides have deployed their troops:
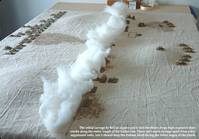
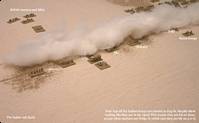
The British artillery barrage drops HE and smoke along the entire length of the Italian line. This should blind the Italians for a while and allow the British to advance to the wire in relative safety. Although the Italians are blinded by the smoke, several units are also suppressed by the HE, including the CO!
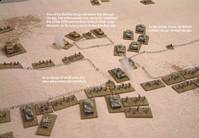
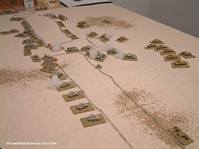
The advance begins in the centre, with the Vickers light tanks racing forward towards the wire. These lightly armed tanks will aim to hold the Italians on the other side of the minefield, to prevent them from concentrating against the breakthrough on the left.
British infantry advance in the wake of the Matildas. These slow but relatively heavy tanks will provide the hammer with which to smash through the Italian line in the centre. Once through, the fast cruisers will race past and head into the Italian rear. Well that's the plan!
On the left, the engineers make good progress and reach the high ground infront of the minefield. Their task is to clear a path through the minefield on the far left and provide the British with a second breakthrough. Concentrating in one place is all very well and good, but it also allows the defender to concentrate his forces against one point.
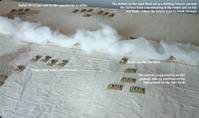
Finally, the British mortars, an MG platoon and a recce platoon advance on the far right. They will act as a holding force against the Italians on that flank, to prevent them from concentrating against the breakthrough in the centre and on the far left.
The Italians didn't have anything to do during their turn as they were blinded by the smoke, plus the CO was suppressed, making any form of movement difficult to say the least.
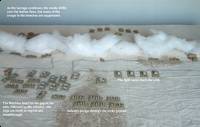
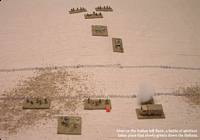
Turn two sees the smoke drift over the Italian lines*, exposing the forward positions, but many of these are suppressed by the continuing artillery barrage. The Italian CO is out-of-action for a second turn!
The British light tanks reach the wire on the centre-right, whilst the Matildas head for the gap in the wire, closely followed by the infantry. The A-13 cruisers move forward ready to exploit the breakthrough.
Forward elements of the British infantry assault the Italian recce troops in the gap, but are unsuccessful. The Brits are knocked-out and the Italians stay-put. The latter make an evade move back behind the wire at the start of the Italian turn.
On the far left, the engineers hesitate this turn, whilst on the right, the recce establishes communication with the HQ, but unfortunately the command fails to get any orders through...
Casualties
The British have taken the first casualties, losing one infantry platoon, so are 1/20 away from their breakpoint. The Italians have yet to take any casualties so are 0/11 away from their breakpoint.

The smoke drifts back over the wire this turn, helping the British effort tremendously. The engineers reach the wire on the left flank and the infantry advance through the rocky ground in the centre. Unfortunately, the CO is caught in cross-fire and blunders this turn, so the advance in the centre loses momentum for the time being.
The Italian scheduled artillery strike takes the British by surprise in the centre, but unfortunately lacks the intensity to do any lasting damage. Both the British CO and FAC are caught in the zone, but neither are affected.
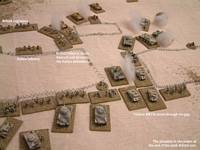
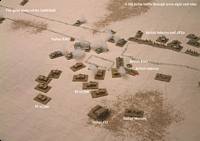
As the point-of-attack is now clear to the Italians, the CO moves one company of medium tanks to cover the gap through the minefield. They are a poor match for the heavier Matildas, but should cause problems for the lightly armoured cruisers and Vickers Mk-VIs.
Finally, the smoke clears at the beginning of turn four. The engineers begin to clear a path through the minefield after the engineers behind the wire suppress the Italians threatening the minefield. On the centre-right, the Vickers light tanks suppress the Italian infantry opposite. The Rolls Royce recce troop manages to communicate with the HQ nearby, allowing the commander there to make more informed decisions, ie: issue more orders!
On the far right, the HQ blunders and all the troops under his command open fire at the enemy, suppressing the infantry opposite. The Vickers tanks cause more casualties, knocking-out the infantry and suppressing the MGs in the centre.
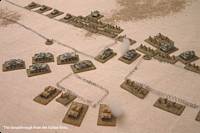
Half of the Matilda squadron advances through the gap in the minefield, with one troop coming under fire at close-range from the ATGs and mediums and becoming knocked-out. The other half of the squadron retalliate and knock-out one platoon of M-11/39s. Meanwhile, the A-13s race through the gap into the Italian lines!
During the Italian turn, an exchange of fire across the minefield suppresses some Brit infantry. The M-11/39s and ATGs suppress the other Matilda troop. The mediums in reserve behind the high ground move forward. Opportunity fire from the British A-13s back-fires, leaving half of the cruisers suppressed...
Casualties
The British have now lost one infantry platoon and one Matilda troop, so are 2/20 away from their breakpoint. The Italians have lost the recce platoon, one infantry platoon and one platoon of M-11/39s, so are 3/11 away from their breakpoint.
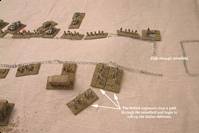
The British engineers finally clear a path through the minefield. The engineers following pass through the gap and clear out the Italians on the far right, threatening to roll-up the Italian flank. The mortars on the right flank knock-out the ATG opposite.
In the centre, the British infantry pile into the gap and another M-11/39 platoon is knocked-out in an exchange of fire with the cruisers and Matildas.
As the situation looks bleak for the Italians, luck is on their side. The FAO makes two requests for artillery against the gap in the minefield and both are successful (one battalion of 75s, followed by a battalion of 105s). This devastates the British infantry and even suppresses the FAO and CO.
The M-11/39s move forward and stop the British armoured thrust in its tracks, knocking-out three A-13 troops and a Vickers troop!
Casualties
The British have now lost six infantry platoons, one Matilda troop, three A-13 troops and one Vickers troop, so are now 11/20 away from their breakpoint. The Italians have lost the recce platoon, two infantry platoons, one ATG platoon and two platoons of M-11/39s, so are 5/11 away from their breakpoint.
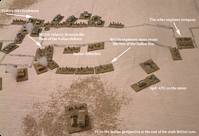
The engineers continue to roll-up the Italian flank, take-out the ATG platoon on the high ground, then threatening the rear of the Italian line, overrunning the CO in the process! The other engineer company advances through the gap in the minefield.
In the centre, the infantry push through the gap, assault the Italians in defence by the wire, then move onto the flank of the remaining defenders. The Vickers light tanks head through the gap too.
The Italian turn sees more artillery hit the Brits in the gap, but just a battalion of 75s against mostly armoured targets has little effect, suppressing two of the Vickers troops and one infantry platoon. The M-11/39s on the high ground knock-out the remaining A-13 troop and some intense fire also KOs another troop of Matilda infantry tanks.
Casualties
The British lost a further three units this turn, so are 14/20 away from their breakpoint. The Italians are now 7/11 away from their breakpoint. It's turning out to be a tough old fight for both sides...
There is much combat in and around the Italian defences on the left flank where the British have broken through. At the end of the British turn, only the Italian MG platoon was remaining and the next turn, this unit surrendered to the British. Note that there are no rules for surrendering units at the moment, but I think there is scope for doing so, especially in campaign battles.
Nothing much else happens on the left flank for the British as two HQs and the FAO fail their command rolls, but over on the neglected right flank, the British mortars and MGs knock-out an Italian MG platoon behind the wire.
The Italian FAO attempts to request more artillery, but blunders. One of the Vickers troops is knocked-out infront of the ATG and M-11/39s. Two British infantry platoons are knocked-out in combat on the high ground.
Casualties
The British are now 17/20 away from their breakpoint, the Italians just 10/11 away from theirs.
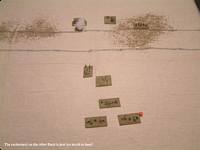
Turns eight and nine saw a lull in the battle as both sides tried to deal with their losses as best they could. The Italian position on the far right was pretty much non-existant, but the armour was moving in that direction to try to stem the British advance.
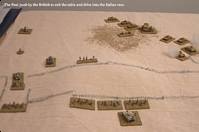
At the same time, the British recognised the futility of trying to break through in the centre and headed for the breach in the minefield - this offered the best way through the Italian defences, which were proving tougher than expected due to the concentration of armour in the centre.
Casualties
The British were still 17/20 away from their breakpoint, the Italians still 10/11 away from theirs.
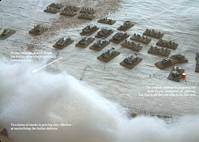
British 25pdrs manage to suppress the Italian CO, then the FAO blunders when attempting to request the 6 inch howitzers. The race through the breach in the minefield sees a troop of Vickers and a 2pdr ATG platoon exit the table, with more units following! One Italian infantry platoon on the other flank is knocked-out, meaning the Italians have reached their breakpoint...
A successful rally means the Italians fight on! As the CO was suppressed, one of the HQs was used to rally the troops - a minor miracle if ever there was one. Some re-deployment of the medium tanks to stem the British breakthrough sees one company of M-11/39s edge their way forward towards the far right of the battlefield. Another British infantry platoon bites the dust somewhere in the centre.
Casualties
The British lost another infantry platoon, so are 18/20 away from their breakpoint. The Italians have now reached theirs! Can they hold on until the end of the battle?

Is this the turn where the Italians act as their historic counter-parts and go "in-the-bag", or do they continue the fight?
British artillery continues to pound the empty desert, but catches the Italian CO and suppress him! The British CO gets carried away with himself, encouraging his troops to plough-on... nine more units exit the table.
Well, the Italians again manage to rally and the battle continues. The FAO directs the 75s against the British mortars on the left flank, suppressing one of them. A company of medium tanks knock-out another British infantry platoon, whilst the remainder move against the Brits on the right.
Casualties
The British are 19/20 away from their breakpoint, the Italians are still on theirs.
The final turn of the game sees one British HQ blunder, getting caught in cross-fire, to no effect. The remaining 2pdr platoon is knocked-out by opportunity fire as it attempts to exit the table, meaning the British have now reached their breakpoint too! The end of the British turn sees the FAO, an HQ and the CO exit the table.
The Italian CO now has to rally the troops and still they fight-on! The artillery hits the British on the left flank, but to little effect. The M-11/39s knock-out yet another infantry unit on the right.
End of the Battle
That is the end of the 12th turn of the game and thus the end of the battle and what a battle it turned out to be! The Italians made the British pay for every inch of their breakthrough and inflicted sufficient casualties that they may just gain a victory over the British!
The victory conditions for the British was to exit 25% of their troops off the opposite table edge in order to gain a minor victory and 50% to gain a major victory. The victory conditions for the Italians was to prevent this. The British managed to exit 14 units from the table, but one was a recce unit and three were command units, which don't count. That leaves ten units, which is exactly 25% of eligible units in the British battlegroup (ie: 40 in total). That's enough to secure a minor victory.
However, the British lost a total of 22 units, totalling 640 points. The Italians lost just 13 units, totalling 315 points. As the Italians destroyed more than double the number of points worth of troops, they increase their victory from a minor (for preventing the British from exiting 50% of their troops) to a major victory. After comparing the two results, the Italians win a Minor Victory over the British - bravo!