Operation Compass: British Pursuit Attack
After a slight delay, the British are off in pursuit of the retreating Italians! The British player elected to field 1500 points, meaning the Italian player could field half that amount. The units were selected from the forces currently available and are detailed below:
British Battlegroup
The British deployed the following in their pursuit against the Italians:
- CO
- Recce (Carriers & Rolls Royce)
- Light Tank Squadron, 6RTR (50% understrength)
- Cruiser Tank Squadron, 6RTR
- 2nd Battalion, 16th Infantry Brigade
- Infantry Tank Squadron, 7RTR
- FAO
- Field Artillery Regiment
- Medium Artillery Regiment
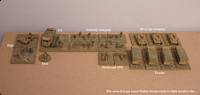
Italian Battlegroup
The Italians deployed the following:
- CO
- Divisional ATG Company
- Infantry Battalion & Trucks
- Medium Tank Battalion (33% understrength)
- FAO
- Light Artillery Battalion
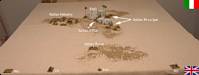
Deployment
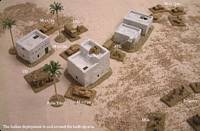
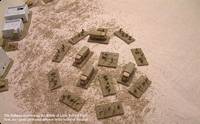
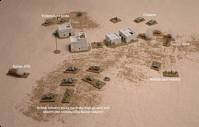
The Italian player (Pete) deployed his units on the table first, then the British player (Olaf) decided which table edge he would use as his baseline. He then deployed his command units along the table edge as his formations would use mobile deployment. The Italians were then able to pivot to face the enemy if they wished to do so (which they did!).
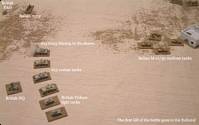
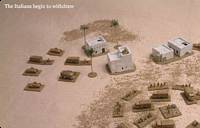
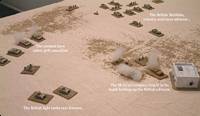
The British began the battle, entering the table on the left with the infantry in their captured Italian trucks and on the right with the Cruisers and light tanks racing ahead. The CO rolled a blunder and remained off-table with the Matildas this turn!
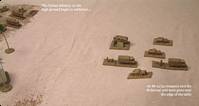
The Italian M-11 company on the left concentrated its fire against the nearest A13 troop, knocking it out - first blood to the Italians! The M11 company and the anti-tank guns in the centre started pulling-back, but the infantry on the high ground remained in-place this turn despite the commander ordering them to withdraw.
Casualties
The Italians were still 0/9 away from their breakpoint, but the British were now 1/10 away from theirs after losing the A13 troop.
The second British turn saw the remaining A13s suppress an M-11 platoon, but the pursuit was lacking in spirit as the infantry on the left stopped for tea and the CO went off for a sunbathe on the back of one of the Matildas!
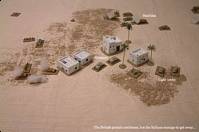
With the British taking their time, the Italians decided to really make an effort this turn to withdraw. The M-11s and ATGs continued their withdrawal and the infantry started the long slog back across the desert - with not enough trucks to go round, they all decided to walk! Plus the fact that trucks are vulnerable to artillery fire.
Casualties
The Italians were still 0/9 away from their breakpoint and the British still 1/10 away from theirs.
The pursuit picked up some momentum this turn, but only on the British right flank - the light tanks raced round the Italian flank and the A13s managed to knock-out their first M-11 platoon...
Over to the Italians and the two remaining M-11 platoons knocked-out a second A13 troop with the help of the recce infantry on the hill establishing communication with the HQ. The artillery also made an appearance this turn, knocking-out some infantry in trucks on the Italian right and suppressing the HQ. The withdrawal continued, with units marching boldly towards the rear (hey, they're not routing!)...
Casualties
The Italians were now 1/9 away from their breakpoint and the British were 3/10 away from theirs.
The Vickers light tanks continued on their way past the buildings on the Italian left flank, the remaining cruisers advancing towards the stubborn M-11 company and managing to knock-out one more platoon - jolly good show, chaps! Over on the British left, the infantry in their transports were beginning to sweat as the HQ was suppressed and no orders got through. In the centre, the CO finally decided to make an appearance, with the Matildas and a couple of infantry platoons advancing swiftly on to the battlefield!
Meanwhile, the Italian withdrawal was well under way, with the rear-most M-11 company and the divisional anti-tank guns exiting the table!
Casualties
The Italians were now 2/9 away from their breakpoint and the British 3/10 away from theirs.
The pursuit was leisurely to say the least! The Vickers light tanks finally caught-up with the retreating Italian infantry, but what could two troops of tanks do against a mass of infantry - there were just too many targets! Spoilt for choice, they did nothing much... The Cruisers, however, finished off the M-11 platoon by the buildings. The Matildas made steady progress and the infantry in the trucks, encouraged by the infantry tanks on their immediate right, moved forward once again. The excitement was almost too much to bear - almost ;-)
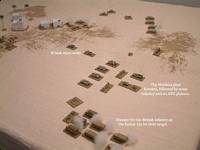
Italian forward observers, never one to miss a nice, juicy target, got the 75s into action again. All of a sudden, trucks disintegrated in a mass of high-explosive, rock and shell splinters, the occupants crawling from the wreckage, fit for nothing more in this battle. Four trucks, two infantry and two MG platoons were lost. At the sound of much widespread destruction, the Italian infantry - dived for cover and halted the withdrawal. Not to worry, better safe than sorry, eh?
Casualties
The Italians were still 3/9 away from their breakpoint, but the British were now 7/10 away from theirs - oops!
Outraged by the loss of his infantry, the British player called for the much needed support of the 25pdrs. Like clock-work (well this turn anyway!), they retalliated and caught the Italian infantry in the open. The Italians lost a mortar platoon, infantry platoon and the battalion ATG. The light tanks continued to harrass the infantry on the other flank, the Cruisers coming through the built-up area in an attempt to join in.
At the rear, the British recce (what, may you ask, was reconnaissance doing at the rear?) raced foward in the centre - penants waving in the wind. The infantry battalion, with few survivors, was as good as out of the battle, so nothing more from them this game. The Matildas and accompanying infantry, however, continued to plod forward, reaching the gentle slopes of the high ground where the Italian infantry began the battle.
Nothing much from the Italians this turn, other than the withdrawal continued anew, with the infantry making steady progress. The recce infantry began to pull-back across the open desert towards the buildings.
Casualties
The Italians were now 6/9 away from their breakpoint and the British still 7/10 away from theirs.
The pressure was on both sides now, with the Italians fading away infront of the hesitant British pursuit. The light tanks took a couple of Italian units under fire, but the Cruisers couldn't do much until they closed the range - the 2pdr guns being useless against infantry targets. The British recce continued forward in the centre, advancing round the Italian infantry and managing to get into a blocking position at the edge of the table!
Three of the Matilda troops and infantry traversed the gentle slopes, taking in the sight of the withdrawing Italians - again, they had to close the range to do any damage. The other Matilda troop, noticing that the Italian recce troops were withdrawing to their right, turned-off to engage them with machine guns, knocking them out.
The Italians, not to be outdone by some obsolete armoured cars and a few infantry in carriers, showed their determination and some managed to exit the table together with the remaining trucks! The artillery observers pulled-back to the high ground near the Italian baseline.
Casualties
The Italians were 8/9 away from their breakpoint and the British were 7/10 away from theirs.
On the final turn of the game, the British really had to do something decisive - but what could they do? Yep, the trusty 25pdrs would win the day yet again! Trouble was, they fouled-up and hit their own recce units that were blocking the Italian withdrawal... damn artillery. The Matildas did manage to close-in for the kill on a stray Italian MG platoon, but that was all the Brits could manage on this final phase of the battle. Thanks for coming, guys - it was a blast...
So over to the Italian commander, confident of victory on this final turn of the game (oh yeah, the Brits reached their breakpoint when they lost the recce units!). The Italian forward observers were thrilled at the British gunners' aim and out of shere spite, landed the 75s right on a Brit 2pdr platoon that was bringing up the rear. Staring victory in the face, the Italian infantry legged-it off the table, leaving just two suppressed units behind.
An Italian victory no less and a welcome victory in the campaign as the initiative now swings back to the Italians... Bravo, Bravo!
The victory conditions for the attacker during a pursuit are to knock-out at least 25% of the opponents' units to secure a minor victory and break the opposing battlegroup to gain a major victory. The British achieved the former, managing to knock-out 8 units out of a total of 18.
The Italians, on the other hand, managed to exit 9 units - or 50% - out of a total of 18. This means they gain a major victory! Now calculating the Victory Points for each side, the British are awarded 205, but the Italians are awarded 430. As the British have less than half the points than the Italians, their minor victory becomes no victory at all and the Italians achieve a Decisive Victory!!!
Moving on to the campaign page (p.41 of the rule book), the result of the battle on the campaign is another Pursuit Attack by the British! They just won't give up, these stubborn Brits...